Yoga is an ancient discipline which seeks to bring your body and mind into a harmonious state. It has been found to have a range of benefits such as:
- Easing stress and improving general well being
- Relieving neck pain, lower back pain, headaches, etc
- Helping with weight loss
- Helping to deal with depression and anxiety
- Helping people quit smoking[1][Yoga: What You Need To Know](https://www.nccih.nih.gov/health/yoga-what-you-need-to-know “Yoga: What You Need To Know”). National Institutes of Health.
Benefits Of Yoga For Glowing Skin
But can it help give you radiant, beautiful skin? Yes. It has been found that yoga:
1. Relieves Skin-Damaging Stress
Studies show that yoga can bring down levels of the stress hormone cortisol and reduce stress.[2]Gothe, Neha P., Rahul K. Keswani, and Edward McAuley. “Yoga practice improves executive function by attenuating stress levels.” Biological psychology 121 (2016): 109-116. But does this have an impact on your skin? Yes! Studies show that stress can:
- Trigger acne flare ups: Too much cortisol triggers the over production of oil by glands in your skin. This can lead to blocked pores and acne.[3] Rao, Akshatha, Sotonye C. Douglas, and Julianne M. Hall. “Endocrine Disrupting Chemicals, Hormone Receptors, and Acne Vulgaris: A Connecting Hypothesis.” Cells 10, no. 6 (2021): 1439.
- Worsen inflammatory skin conditions: Inflammatory skin conditions such as psoriasis and eczema can be triggered or worsened by stress.[4]Chen, Ying, and John Lyga. “Brain-skin connection: stress, inflammation and skin aging.” Inflammation & Allergy-Drug Targets (Formerly Current Drug Targets-Inflammation & … Continue reading
- Cause premature skin aging: Research indicates that cortisol can degrade collagen, the protein that gives your skin strength and firmness. Loss of collagen can lead to less elastic skin and wrinkles.[5]Mi, Yabing, Wangsheng Wang, Jiangwen Lu, Chuyue Zhang, Yawei Wang, Hao Ying, and Kang Sun. “Proteasome-mediated degradation of collagen III by cortisol in amnion fibroblasts.” Journal of … Continue reading
2. Can Improve Blood Circulation And Help Nourish Your Skin
Studies have found that yoga can improve blood circulation. How does this help your skin? Blood carries nutrients to your skin and nourishes it. So for healthy nourished skin turn to yoga.[6]Soni, Ritu, Kanika Munish, K. P. Singh, and Savita Singh. “Study of the effect of yoga training on diffusion capacity in chronic obstructive pulmonary disease patients: A controlled … Continue reading [7][Components of skin](https://medlineplus.gov/ency/anatomyvideos/000029.htm “Components of skin”). U.S. National Library of Medicine.
3. Can Improve Sleep Leading To Healthier Skin
Studies have found that yoga can improve the quality of your sleep.[8]Halpern, Jonathan, Marc Cohen, Gerard Kennedy, John Reece, Clement Cahan, and Armanda Baharav. “Yoga for improving sleep quality and quality of life for older adults.” Altern Ther Health … Continue readingHow does this affect your skin? One study looked at the effects of sleep deprivation on the skin of women in their 40s. They found that sleep deprivation increased wrinkles, and negatively impacted skin texture, elasticity, and moisturization.[9]Jang, Sue Im, Myeongryeol Lee, Jiyeon Han, Jeonghwan Kim, A. Reum Kim, Ji Soo An, Jin O. Park, Beom Joon Kim, and Eunjoo Kim. “A study of skin characteristics with long‐term sleep restriction … Continue reading
8 Yoga Asanas For Radiant Skin
Let’s take a closer look at a few yoga poses or asanas that can give you radiant skin:
1. Child Pose (Shishuasana)

This pose can deeply relax your back, soothe the nervous system, and ease constipation.
How to do Shishuasana
- Kneel and sit down on your heels. With your hips still touching you lean forward and touch the floor with your forehead.
- Place your arms on either side of your body with the palms facing upwards. In case this is uncomfortable you can place one fist on top of the other and place your forehead on them.
- Press your chest to your thighs gently and hold this position.
- Gently lift your chest up and sit on your heels again.
Precautions
This pose is not recommended for
- those with knee or back injuries
- pregnant women
- those suffering from or recently recovered from diarrhea
2. Cobra Pose (Bhujangasana)
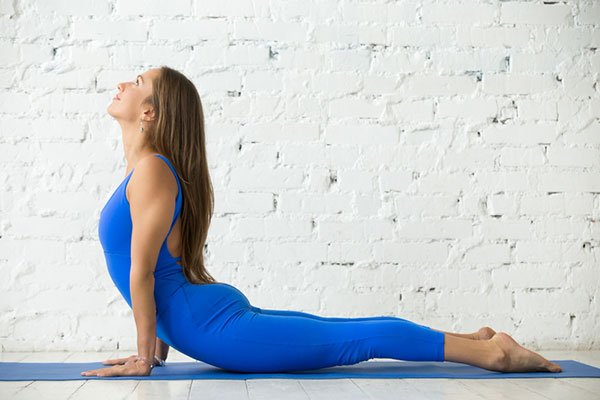
Bhujangasana is said to:
- Open up your neck and shoulders to ease pain
- Tone your abdomen
- Strengthen your shoulders and back
- Improve the flexibility of your middle and upper back
- Expand your chest
- Improve blood circulation
- Lessen stress and fatigue
- Help those with respiratory conditions like asthma
- This pose is included in Surya Namaskar (sun salutation which is a sequence of 12 asanas) as well as Padma Sadhana, a sequence of asanas also known as lotus meditation. There are a few things that you need to keep in mind when you do the bhujangasana:
- Performing this asana in an ideal physical state will help you get the most out of it.
- Perform this asana 4 to 5 hours after eating your main meal so that you don’t find lying on your stomach uncomfortable.
- Do some basic stretching and warm-up exercises before you start the asana to loosen your shoulders, arms, back, and neck.
- It is best to practice this asana in the morning though if you’re unable to you can also do it in the evening.
- Bhujangasana can be performed more seamlessly when you ease into it with adho mukha svanasana (downward-facing dog pose) and salamba bhujangasana (sphinx pose) as preparatory poses.
How to do Bhujangasana
- Lie down on your stomach, the soles of your feet facing upwards and your toes touching the floor. Rest your forehead on the floor.
- Make sure your legs are kept together, your feet and heels should lightly touch each other.
- Touch the floor beneath your shoulders with your palms. Keep your elbows parallel and close to your body.
- Breathing in deeply, lift your head, chest and abdomen slowly. Make sure your navel is still touching the floor.
- Put equal pressure on both your palms and pull back your torso lifting it off the floor.
- Breathe with awareness and curve your spine. Try straightening your arms by arching your back. Look up and tilt your head backwards.
- Maintain this pose for 4 to 5 even breaths.
- Then breathe out and bring your abdomen, chest, and head back to the ground gently.
- Repeat 4 to 5 times.
- You can try following bhujangasana with dhanurasana (bow pose), shalabasana (locust posture), and viparita salabhasana (superman pose)
Tips for beginners
- Try to avoid overstretching and jerks.
- You may unintentionally move your shoulders away from your ears. Even if you need to bend your elbows, keep your shoulders relaxed. With practice you will learn to deepen the stretch by straightening your elbows.
- Breathe evenly while doing the pose and make sure that your feet are close together.
Precautions
This pose is not recommended:
- For those who are pregnant
- For those suffering from carpal tunnel syndrome
- For those with fractures in their wrists or ribs
- For those who’ve recently had abdominal surgery
- During an asthma attack
- For those who had spinal disorders or chronic diseases in the past except under the supervision of a trained yoga teacher
3. Plow Pose (Halasana)
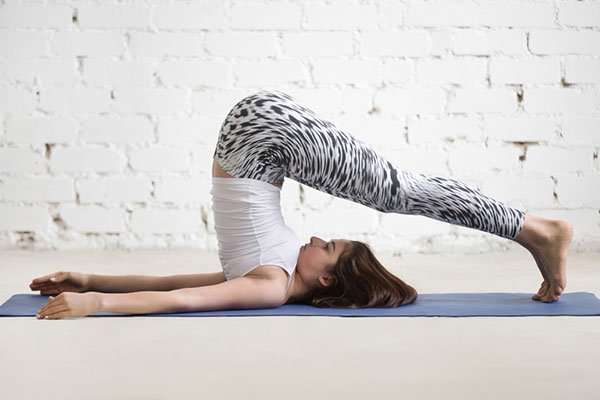
Just as the plow prepares the field for sowing, the plow pose or halasana is said to prepare the mind and body for deep rejuvenation. This pose is said to:
- Strengthen and open up your shoulders, neck, back muscles and abdominal muscles.
- Ease fatigue and stress and calm your nervous system.
- Tone your legs and boost leg flexibility.
- Make your immune system stronger and stimulate the thyroid gland.
- Help during menopause.
You can do the poorva halasana (preliminary plow pose), sarvangasana (shoulder stand), or setu bandhasana (bridge pose) as preparatory asanas before you practice the halasana pose.
How to do Halasana
- Lie flat on your back with your arms close to you, the palms facing downwards.
- Inhale and use your stomach muscles to lift your feet off the ground. Raise your legs straight up at a 90-degree angle.
- Breathe normally and lift your back and hips off the floor using your hands to support them.
- Sweep your legs in a semi-circle over your head and touch your toes to the floor. Your back should be at a 90-degree angle to the floor.
- Hold this pose, allowing your body to relax more deeply with each breath.
- After around a minute (or a few seconds if you’re a beginner) of holding this pose, you can bring your legs down gently as you exhale.
Tips for beginners
Be careful not to strain your neck or press it into the floor when you do this pose. Slow and gentle is the way to go.
Use the top of your shoulders to support your back. You can lift your shoulders a bit towards your ears to do this.
When you bring your legs down try not to jerk your body.
Halasana can be followed by the wind-relieving pose (pavanamuktasana) or the cobra pose (Bhujangasana).
Precautions
This pose is not recommended
- For those who have a neck injury, high blood pressure, or diarrhea
- While pregnant or during the first couple of days of the menstrual cycle
- For those who had spinal disorders or chronic diseases in the past without their doctor’s clearance
4. Shoulder Stand (Sarvangasana)
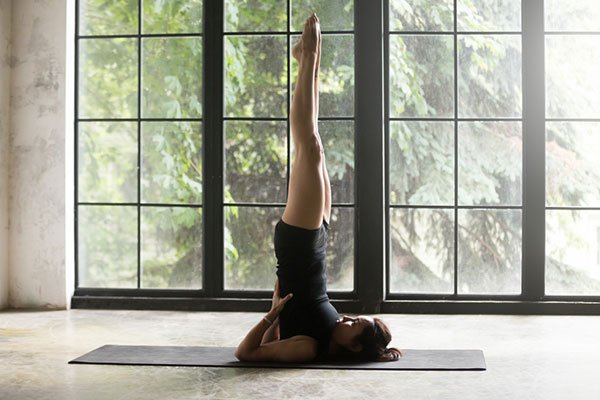
During sarvangasana your whole body is balanced on your shoulders. This asana forms a part of the padma sadhana sequence. It has an influence on all parts of your body, the functioning of all parts of your body and is thought to be helpful in maintaining your physical as well as mental health. Also known as the ‘queen of asanas’, sarvangasana is said to
- Stimulate your parathyroid and thyroid glands and normalize their functions
- Strengthen your shoulders and arms as well as keep your spine flexible
- Nourish your brain by improving blood flow
- Stretch your heart muscles
- Relieve constipation and indigestion and improve varicose veins
How to do Sarvangasana
- Lie flat on your back, your hands at your side.
- With a single movement, lift up your legs, buttocks and back with your shoulders still on the ground. Use your hands to support your back.
- Move your elbows closer to each other, and run your hands along your back, moving up towards your shoulder blades. Keep your spine and legs straight by pushing your elbows to the ground and pressing your hands into your back. Make sure that your weight falls on your upper arms and shoulders and not your neck or head.
- Lift up your heels as though you’re going to place them on the ceiling. Now bring your big toes over your nose and point them upwards. Make sure your neck is not pressing into the ground. Tighten your neck muscles slightly and keep your neck strong. Bring your breastbone towards your chin. But remember you shouldn’t be feeling any strain in your neck while doing this. If you do then come out of the pose.
- Breathe deeply and hold the pose for 30 to 60 seconds.
- To exit this pose, bring your knees down to your forehead. Then bring your hands to the ground with the palms facing down. Then bring your spine down to the floor slowly, without lifting your head. Now lower your legs to the ground and relax for at least a minute.
Precautions
- Do not perform this asana without your doctor’s clearance if you
- Are pregnant or menstruating
- Have heart problems, glaucoma, high blood pressure, neck pain, spondylosis, slip disc, thyroid problems
5. Forward Bend Pose (Prasarita Padahastasana)
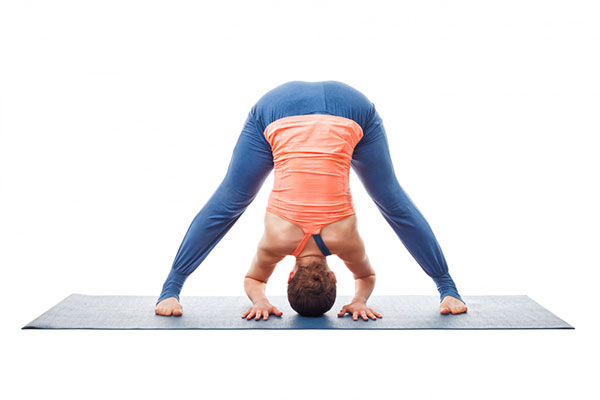
Prasarita padahastasana or forward bend pose is said to
- Strengthen the feet and legs
- Improves flexibility of your spine
- Stretch your hamstrings
- Strengthen your abdomen
How to do Prasarita Padahastasana
- Stand up straight with your feet 3 to 4 feet apart. You should be firmly grounded and balanced. Take deep, gentle breaths.
- Inhale, stretch your spine, and stretch your arms upwards.
- Exhale and bend forward from your hips, making sure your spine remains straight.
- Place your hands on the floor, under your shoulders. Take deep gentle breaths.
- Bend down further, lifting up your hips and breathe out. Bring your head towards the ground between your hands.
- Move your thighs apart from each other. You can separate your feet further if you’re stable and balanced.
- Press on the ground with your hands to deepen the bend while breathing out. You can even hold your big toes and pull, to deepen the bend.
- Inhale, and come back up slowly while stretching your arms to the front.
- Exhale, and bring your arms to your sides
Precaution
- Do not perform this asana if you suffer from lower back pain or have a heart condition or have hypertension.
6. Downward Facing Dog Pose (Adho Mukha Svanasana)
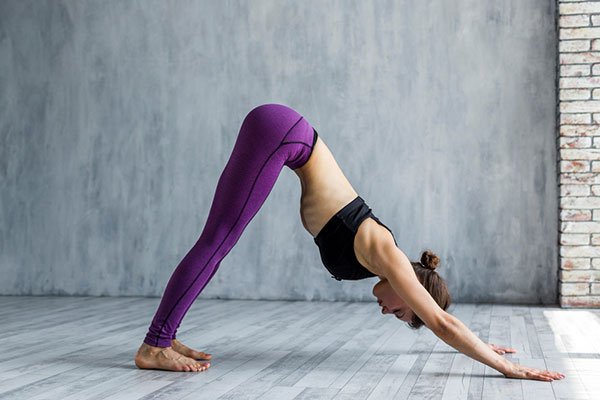
This posture imitates a dog bending forward. It forms a part of the sequence of asanas in surya namaskar. It’s a simple asana that is easy for even a beginner to do. It is said to:
- Energize and rejuvenate you
- Stretch your spine
- Strengthens the muscles of your chest and increases lung capacity
- Strengthen the body, particularly the shoulders, arms, feet, and legs
- Tone your muscles
- Improve blood circulation to the brain
- Ease insomnia, headache, and fatigue as well as calm your mind
How to do Adho Mukha Svanasana
Get down on all fours. If you were a table your back would be the table top and your hands and feet would be the legs of the table.
Breath out as you lift up your hips while straightening your elbows and knees. Your body will be in an inverted V shape.
Your hands should be shoulder width apart and your feet should be hip width apart and parallel to each other. Your toes should be pointed straight ahead.
Push your hands into the floor. Keep your neck elongated by touching your ears to your inner arms.
Hold this pose and take deep long breaths while looking towards your navel.
Exhale, bend your knees, and return to the table posture.
Tips for beginners
- Warm up your arms and calves before doing this asana.
- Dhanurasana (bow pose) and dandasana (staff pose) are good preparatory asanas to do before adho mukha svanasana.
- You can follow this asana with ardha pincha mayurasana (dolphin pose), chaturanga dandasana (four-limbed staff pose), and urdhva mukha svanasana (upward facing dog pose)
Precautions
- This asana is not recommended for those with
- rheumatoid arthritis,
- arthritis of the knee and acute knee pain,
- carpal tunnel syndrome,
- weak eye capillaries,
- high blood pressure,
- detached eye retina,
- diarrhea,
- dislocated shoulder or shoulder injury.
7. Triangle Pose (Trikonasana)
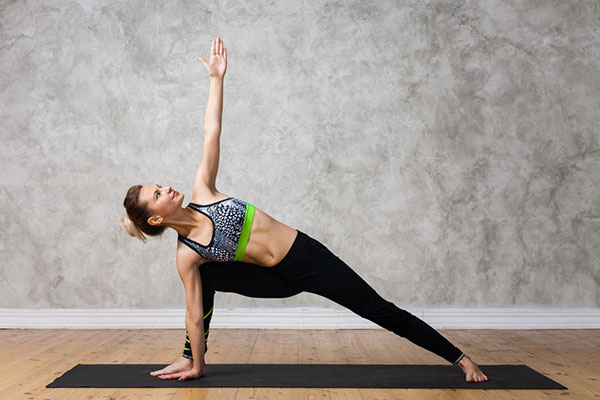
The triangle pose or trikonasana is said to:
- Strengthen the knees, legs, ankles, chest and arms
- Stretches and opens your hips, hamstrings, groins, shoulders, calves, spine and chest
- Improves mental and physical balance
- Improves digestion
- Lessens stress, anxiety, sciatica, and back pain
How to do the Trikonasana
- Stand up straight. Keep your feet comfortably apart (around 3.5 to 4 feet).
- Turn your left foot inwards by 15 degrees and your right foot outwards by 90 degrees.
- Now make sure that the center of your right heel is aligned with the center of your left foot arch.
- Make sure that your body weight is equally on both feet.
- Take a deep breath and while you exhale bend your body to the right, downwards from your hips. Keep your waist straight as you do this and bring your left hand up in the air and your right hand down towards the ground. Make sure your arms form a straight line.
- Place your right hand on your ankle, shin, or the floor whichever is more comfortable. Stretch the left arm upwards to the ceiling. Keep your head neutral or turn left, so that your eyes are gazing at your left palm.
- Your body should be bent sideways but not forward or backward. Your chest and pelvis should be open.
- Stretch to the maximum extent possible while remaining steady. Take long deep breaths, relaxing more deeply as you do so.
- Bring your arms to your side and straighten your feet as you inhale.
- Repeat this process for the other side.
Tips for beginners
- Do a warm up exercise for the whole body before doing trikonasana.
- Bend forward gently and slowly so that you do not lose your balance.
- You can try katichakrasana (standing spinal twist), konasana (the angle pose), and vrikshasana (tree pose) as preparatory asanas before doing the triangle pose.
- Virabhadrasana (warrior pose) is a good follow up asana to do after the triangle pose.
Precautions
This pose is not recommended for those with
- migraine
- diarrhea
- low or high blood pressure
- back or neck injuries
8. Fish Pose (Matsyasana)
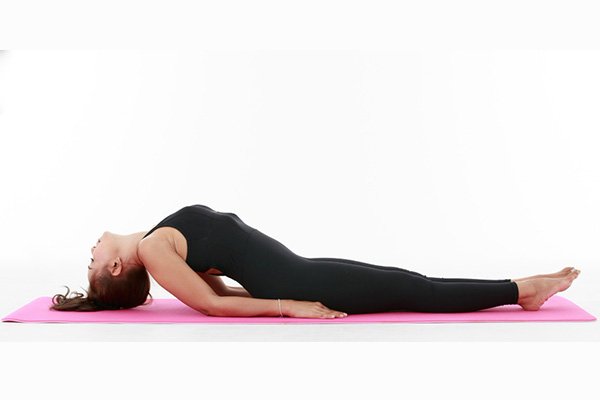
Matsyasana is said to:
- Stretch your neck and chest
- Ease tension in the shoulders and neck
- Provide relief to those with respiratory disorders
- Tone the pituitary, parathyroid, and pineal glands
How to do Matsyasana
- Lie flat on your back with your feet together and your hands at your side.
- Place your hands beneath your hips, with the palms facing down and bring your elbows closer to each other.
- Lift your head and chest upwards as you breathe in.
- Keep your chest elevated as you tilt your head backwards and touch the floor with the top of your head.
- Press your elbows into the floor. But make sure that weight is placed on your elbows and not on your head. Lift your chest up and press your legs and thighs to the floor.
- Hold this pose as long as it’s comfortable. Take long deep breaths and relax as you exhale.
- Now lift up your head, lower your head and chest to the floor and bring your hands back to your side.
Precautions
This asana is not recommended for
- Those with migraines, insomnia, low blood pressure or high blood pressure.
- People who have suffered serious lower back injuries or neck injuries.
Tips For Healthy Skin
1. Protect your skin from the sun
Sun exposure can lead to age spots and wrinkles and even increase your risk of skin cancer. Always use sunscreen when you step out. Wear protective clothing – wide hats, long sleeves, long pants etc. – to stay safe from the sun.
2. Be gentle with your skin
Long baths and hot showers can strip your skin of oils. Use warm water, and limit the amount of time you spend in the bath or shower. Also avoid harsh soaps and remember to moisturize if your skin feels dry.
3. Have a healthy diet
Have a diet rich in veggies, fruits, lean proteins, and whole grains. Also make sure you drink plenty of water. A healthy diet will provide the nutrients needed to keep your skin healthy.
4. Keep stress under control
High stress levels can wreak havoc on your skin. Get sufficient sleep, practice meditation and yoga, and manage your workload to reduce stress.[10][Skin care: 5 tips for healthy skin](https://www.mayoclinic.org/healthy-lifestyle/adult-health/in-depth/skin-care/art-20048237 “Skin care: 5 tips for healthy skin”). Mayo Clinic.
References
| ↑1 | [Yoga: What You Need To Know](https://www.nccih.nih.gov/health/yoga-what-you-need-to-know “Yoga: What You Need To Know”). National Institutes of Health. |
|---|---|
| ↑2 | Gothe, Neha P., Rahul K. Keswani, and Edward McAuley. “Yoga practice improves executive function by attenuating stress levels.” Biological psychology 121 (2016): 109-116. |
| ↑3 | Rao, Akshatha, Sotonye C. Douglas, and Julianne M. Hall. “Endocrine Disrupting Chemicals, Hormone Receptors, and Acne Vulgaris: A Connecting Hypothesis.” Cells 10, no. 6 (2021): 1439. |
| ↑4 | Chen, Ying, and John Lyga. “Brain-skin connection: stress, inflammation and skin aging.” Inflammation & Allergy-Drug Targets (Formerly Current Drug Targets-Inflammation & Allergy)(Discontinued) 13, no. 3 (2014): 177-190. |
| ↑5 | Mi, Yabing, Wangsheng Wang, Jiangwen Lu, Chuyue Zhang, Yawei Wang, Hao Ying, and Kang Sun. “Proteasome-mediated degradation of collagen III by cortisol in amnion fibroblasts.” Journal of molecular endocrinology 60, no. 2 (2018): 45-54. |
| ↑6 | Soni, Ritu, Kanika Munish, K. P. Singh, and Savita Singh. “Study of the effect of yoga training on diffusion capacity in chronic obstructive pulmonary disease patients: A controlled trial.” International journal of yoga 5, no. 2 (2012): 123. |
| ↑7 | [Components of skin](https://medlineplus.gov/ency/anatomyvideos/000029.htm “Components of skin”). U.S. National Library of Medicine. |
| ↑8 | Halpern, Jonathan, Marc Cohen, Gerard Kennedy, John Reece, Clement Cahan, and Armanda Baharav. “Yoga for improving sleep quality and quality of life for older adults.” Altern Ther Health Med 20, no. 3 (2014): 37-46. |
| ↑9 | Jang, Sue Im, Myeongryeol Lee, Jiyeon Han, Jeonghwan Kim, A. Reum Kim, Ji Soo An, Jin O. Park, Beom Joon Kim, and Eunjoo Kim. “A study of skin characteristics with long‐term sleep restriction in Korean women in their 40s.” Skin Research and Technology 26, no. 2 (2020): 193-199. |
| ↑10 | [Skin care: 5 tips for healthy skin](https://www.mayoclinic.org/healthy-lifestyle/adult-health/in-depth/skin-care/art-20048237 “Skin care: 5 tips for healthy skin”). Mayo Clinic. |